
In case you missed it, our house went on the market last Thursday and is now currently under contract as of last night. While we did get four offers on it, this is not a post on how you can sell your home quickly, or on how you can get top dollar for your home. Honestly, I’m sure a lot of the reason our home went under contract so quickly is much more due to a hot housing market rather than my own staging abilities, but at any rate, I did learn a TON during the process that I fully plan to take with me when we find our next home.
I’m sure intellectually, a lot of this would have made sense to me before I experienced it firsthand, but WOW, going through the process and seeing the difference? I sincerely hope these are lessons I don’t forget the impact of anytime soon and that will inform my homemaking and home decorating for the rest of my life.
Note: There are affiliate links to products mentioned below, which means I may get a small commission on any purchases made, at no extra cost to you.

Clear the Clutter Already!
I feel like compared to most families with young kids, we don’t have that much stuff, but even still, it was clear once we packed up a ton of the nonessentials for staging that…we have way too much stuff. (Toys, especially!)
No one tells you before you become a parent that you will feel weirdly guilty for giving away, trashing, or selling your kids’ toys, especially if they’re toys you bought yourself. (Or maybe it’s just me?) I feel guilty donating that magnetic “paper” doll set because I know my daughter still plays with it sometimes, but I absolutely despise how all the pieces get everywhere. I feel bad smuggling a few of the less-loved stuffed animals out of the house, especially because I usually make a point of not hiding it from my kids that I’m getting rid of their stuff.

(you can see it peeking out behind the cabinet)
I guess what I’m saying is that I thought I was depriving my children of future play opportunities by getting rid of (or even just packing up for the foreseeable future) the majority of their toys, but guess what happened?
Playtime has been totally unaffected.
The fact is, my kids will play with whatever is there, and if there isn’t a lot, then their play tends to get even more creative.
Now, most of their toys are currently boxed up and ready to be put into storage, but at this point, I’m tempted to just donate the lot. I doubt I’ll go that far, but one thing is for sure — less stuff = less to pick up = happier me.
Remember: Furniture is Not Married To One Particular Room
I don’t know what it is, but it seems like once a particular furniture piece makes it into a particular room, it seems to stay there for the duration of its life or its time in your home, even if it isn’t something that obviously goes into one particular kind of room (like a bed).
One staging guide I read (I can’t remember which now) said that when staging a home, try not to have more than three bigger pieces of furniture in any one room or area of the home. The reasoning behind this is that the less furniture is in a room, the bigger the space feels. I tried pretty hard to do this where it made sense with us still living in the house, and I was shocked by the difference it made.

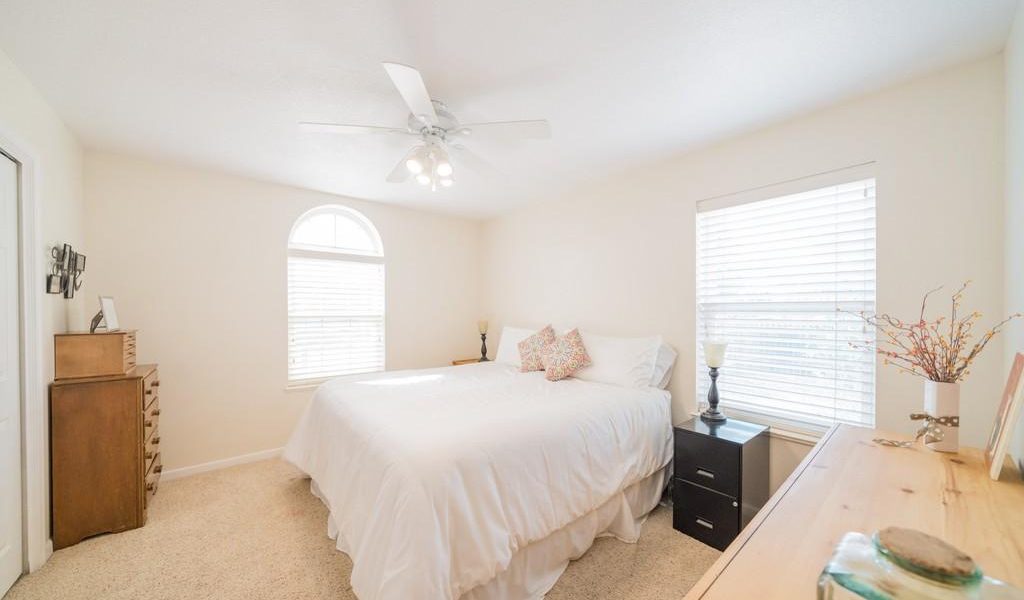
Example: Our guest bedroom before had a queen-sized bed, a big dresser against the window, a bookcase, and a large chair. While the space worked fine as it was for guests, I could acknowledge that the big dresser did make the space seem much smaller, so I tried to think of what I could do with it.
In the basement’s family room, we had an old entertainment center we’d picked up secondhand when we first got married, as well as an old boxy t.v. that fit perfectly inside. We had since been gifted a flat-screen t.v., but we had never set it up because it didn’t really work with our entertainment center.

So, I decided to try using the dresser as the new place to put the flat-screen t.v. in the family room, and we got rid of the old entertainment center and the boxy t.v.

HOLY COW, WHY DIDN’T WE DO THIS FROM THE BEGINNING?!
It seriously looks about a million times better, and all from a simple furniture change based on what we already had.
Be Creative With What You Have On Hand
The last lesson leads right into this one–while I did purchase a few things to stage the home (like a seagrass basket with handles, similar to this), I largely just used what we already had since it didn’t make sense to go out and spend a ton of money on things that wouldn’t really affect the price someone would be willing to pay for the house.
Another staging tip I read was to never leave a room empty—always show buyers a possibility for the room rather than just have it as a blank space. Our “office” wasn’t empty, but it was a total dumping ground for our stuff. When we cleared out all that stuff as part of the first step in getting the house ready, we noticed pretty clearly that the room looked awkward as there was just one piece of furniture in there: the desk that held our computer. So I started shuffling around possibilities in my head, and I finally decided to move over the bookcase from the guest room and the glider from the family room. While removing the bookcase from the guest room meant that that room looked a little more bare than I would have liked (with just two pieces in it), it did start to make the office look at least a little more evened out, especially when we added the glider (which had the added bonus of not blocking the bookcase in the family room that I’d just color-coordinated).


Even still, the office felt lacking, so just before we had a full day of showings, I decided to try a little something on the spur of the moment—I hung a piece of art on the walls on an existing nail hole, and I brought in some wooden ammo boxes from the garage that we’ve been intending to turn into end tables forever now. Topped with a vase and flanked by the aforementioned basket, the space felt much more “finished.”

Now, every time I go into our office, I feel about a million times more inspired and more at ease since the space is not full of random stuff and has a kind of built-in reading nook.
Think Low Cost, High Impact
Keeping costs low was the name of the game for us in getting the house ready, so we set a budget of about $500-600 and really tried to stick to it.
In analyzing what would make the biggest difference, we decided to put the majority of that money towards curb appeal, with the rest being used for a few pieces to stage the home, lightbulbs (more on that below), and the money needed for a few DIY projects we thought would be worth taking on.

Things that were worth every penny:
- Mulch and wood chips to cover the garden beds and the places where we’d sprayed for weeds ($206 to cover all the beds over the whole yard)
- Lawn and weed treatments by a local company to kill off dandelions and other weeds and improve the look and color of our lawn ($106)
- Spray paint for the hardware on the front door to freshen it up ($15)
- A fresh coat of paint for the front door (free, since we had the paint leftover from when we’d painted it before)
- Annuals to fill in our flower pots and some bare spots in our flower beds up front ($20)
- LED Lightbulbs to replace all the ones throughout the house ($80)
- Two trips to the local landfill to get rid of excess stuff we couldn’t donate or sell ($20)
- Materials for new caulking in the bathrooms ($20)
- New navy towels for the bathroom to replace our old ones, which had started to wear to a weird reddish-purple color ($25)
In general, I hate spending money and try to do everything for free that I can (which is overall usually a very good trait), but seeing what a HUGE difference it made to spend a relatively small amount on these things makes me definitely want to budget more for things like this in the future.
Note: I still spent quite a bit of time shopping around on these things, which probably saved us at least $200-300 or so.

Don’t Ignore Your Light Sources!
One of the first things our realtor told us to do in order to stage our home to look its best was to swap out all the lightbulbs in the house for the LED equivalent of 100W bulbs. I’m embarrassed to admit that we had burnt-out lightbulbs all over the house that we’d never replaced (because there were still two or three lightbulbs that worked in the room), and I had also never thought to look at the wattage of the lightbulbs that were in the house when we moved in three years ago, many of which were still working.
The majority of the old bulbs were just 60 watts, and so trust me when I say that when we swapped out all the bulbs to 100W ones AND replaced all that were burnt out, the house was literally transformed. I’d kind of always hated being in our office because it felt so dingy…turns out it only felt that way because two of the three bulbs in the overhead light fixture were burnt out and the one that was left was just a 60W one.
Lesson learned.
And, while we’re here admitting embarrassing truths, you all probably know by now that housework is not generally my forte, and I will often try and get away with doing the absolute minimum for as long as possible. Well, because of that unfortunate tendency, only one window in the house had been cleaned inside and out during the whole three years we lived here, and that was the door leading out to our backyard (mostly because it was the most convenient to clean AND the one that was noticeably the dirtiest since the kids are always putting their hands and faces all over it).
Before we had people come and see the house, my mom took about ten minutes to thoroughly clean our kitchen window inside and out. Not gonna lie, I kinda can’t get over it—every time I look out, I’m amazed at how much greener and fresher our yard looks through it now.

(I did order a new welcome mat, but it was back ordered and didn’t come in time!)
DIY is Not As Scary As It Appears
There were a couple DIY projects we were wanting to try because they fit into our goal of high impact/low cost. One was to spray paint the hardware on our front door, which had gotten dingy after years of direct sun and extreme temperatures, and the other was to redo the caulking along our bathtub, which was poorly done by the previous owners and which had only looked worse and worse over time.
Now, to be fair, I personally didn’t take on either of the projects–the door hardware was done by my mom (who is one of the most capable of DIYers I know), and the other was done by Matt (whose skills in all things handy and DIY have grown astonishingly since we bought the house three years ago). Even still, I was nervous about how the two projects would end up looking, since I knew that a poor DIY attempt could cost us much more money in the long run.

Both projects came off spectacularly though, and they both made a WORLD of difference.
So, in the future, I’ve decided to do more research on simple DIY projects we can take on ourselves that will make a big impact like these did.
Note: For your reference, I found this blog post for my mom to use as a reference for spray painting the door hardware, and I think Matt just looked up a caulking tutorial on YouTube.
Usually Some Attempt Is Better Than No Attempt
This goes along with the above lesson, but it bears a bit more elaboration. Although I consider myself a recovering perfectionist, I still tend to put off doing certain things–like house or decorating projects–until I can do them EXACTLY like I want to. What that usually means is that nothing gets done in the meantime, and we’re left living with blank walls and unintentional minimal decor look.
I kind of learned this lesson awhile ago when we did our $100 bathroom makeover, but I was reminded again of the importance of just doing SOMETHING as I was down to the wire on staging the house and just started trying new things right and left.

So I hung artwork. I bought some basic white curtains (similar here) and hung them on the bare curtain rod in the office, even though I knew I wouldn’t have time to hem them (and honestly, once I folded up the bottoms you couldn’t even tell, since the curtains were behind the desk). I color-coded the spines of the books in our bookcases and found that I kinda fell in love with the look of it. I moved different decor to different rooms, over and over. I told Matt to put caulking on that terrible place in the bathroom where the baseboards were peeling at the corner because “it couldn’t look any worse.” (Spoiler: It looked a TON better, even if it wasn’t close to “perfect.”) I turned boxes into side tables and made impromptu bouquets from what we had in the garden.
AND EVERY SINGLE THING I EVENTUALLY SETTLED ON MADE OUR HOUSE LOOK BETTER.
Were any of my “staged” spaces exactly as I envisioned them? No. I could still see the stains on the carpet, the paint color on the walls that I didn’t love, or the builder-grade cabinets. But just a little bit of extra love and extra effort really made all the difference, and it showed me that I probably have a better eye for decor and beautifying a space than I think I do.

Don’t Wait Until A Move to Work on the Nagging Tasks List!
The biggest takeaway from all this?
To not wait until we’re about to sell our house to make it look its best and do all things that have been bugging me the whole time.
Unfortunately, I’m the kind of person who thrives on a deadline. Procrastination was my middle name throughout all my formal schooling, and without a deadline, I don’t tend to hustle as much. This is one reason I set my monthly goals—any deadline, even a self-imposed one, tends to be key in making me get stuff done.
Hopefully though, even if my house will always be cleanest when I’m moving out, I will have learned not to put off the other stuff, like the garage door servicing or the burnt-out lightbulbs or the hanging-stuff-on-the-walls.
It is not lost on me that the time when I’m enjoying this house the very most is the month right before I’m about to leave it.
Have you ever sold a house before? What did you learn from the process?