Something I’ve heard a lot of people say since I joined the photography business world is that they would love having more professional pictures taken of their families, but that they just can’t afford the prices (which I totally understand!). I’ve also had quite a few people tell me how much they love the monthly portraits I do of Raven and wonder how I go about doing it.
Well, whether you’re looking to save some money by doing your own portraits of your kids or just looking to improve at documenting their life in photos, look no further—
Here are 9 tips for taking better portraits of your kids at home:
(Note: most photos used as examples, with the exception of the ones under the editing tip, are straight out of camera or have minimal edits done to slightly correct the exposure so that you can see the difference of applying that tip without the use of an editing program)
1. Choose a neutral background for your shot.
I always do Raven’s monthly shoots in our bedroom because we have a white bedspread and white walls, so it provides a perfect backdrop for ensuring that all the focus is on my subject. If you don’t have a white bedspread, a white sheet will do just as well. You could also experiment with the look of other colors as your background, such as pale blue or yellow or maybe even a pastel pink.
The key is to make sure that your background color isn’t so bright that it will distract from your subject (which would knock out any bright colors or patterns). The other key is making sure that the background is uniform, meaning that there is only one background color in the shot. That’s why sheets work so great because they’re inexpensive, and if you want to do a colored sheet as your background, you can tape part of it up against the wall to make sure that the background color is the same throughout the shot.
Shot without a neutral background (notice how the background distracts from the subject):

Shot with a neutral background:

2. Take time before the shoot begins to remove anything from the background that might be distracting.
If you’ve taped up a sheet to the wall, this might be partly taken care of already, but you’re going to be taking pictures of your subject from all angles, so make sure you’ve removed as many objects (like books or papers or toys) from your background as possible. Also, make sure that your closets and other doors are closed since open doors distract as well.
Half the battle of getting great portraits is taking care of your background, so make sure you’re paying attention to what could possibly end up in your shot.
(the shot below would have been a lot better if I’d actually remembered to close the closet door beforehand…)

3. Plan the shoot for a time when your subject will be well-rested, well-fed, and in a generally good mood overall.
When your kids are really young (like babies), this won’t be too difficult to plan. When they get more of a will of their own, you might want to “disguise” the photo shoot as an activity or game of some kind so that they’ll be more on board (like maybe making this the one time they’re actually allowed to jump on the bed or having them twirl around or show how high they can jump).

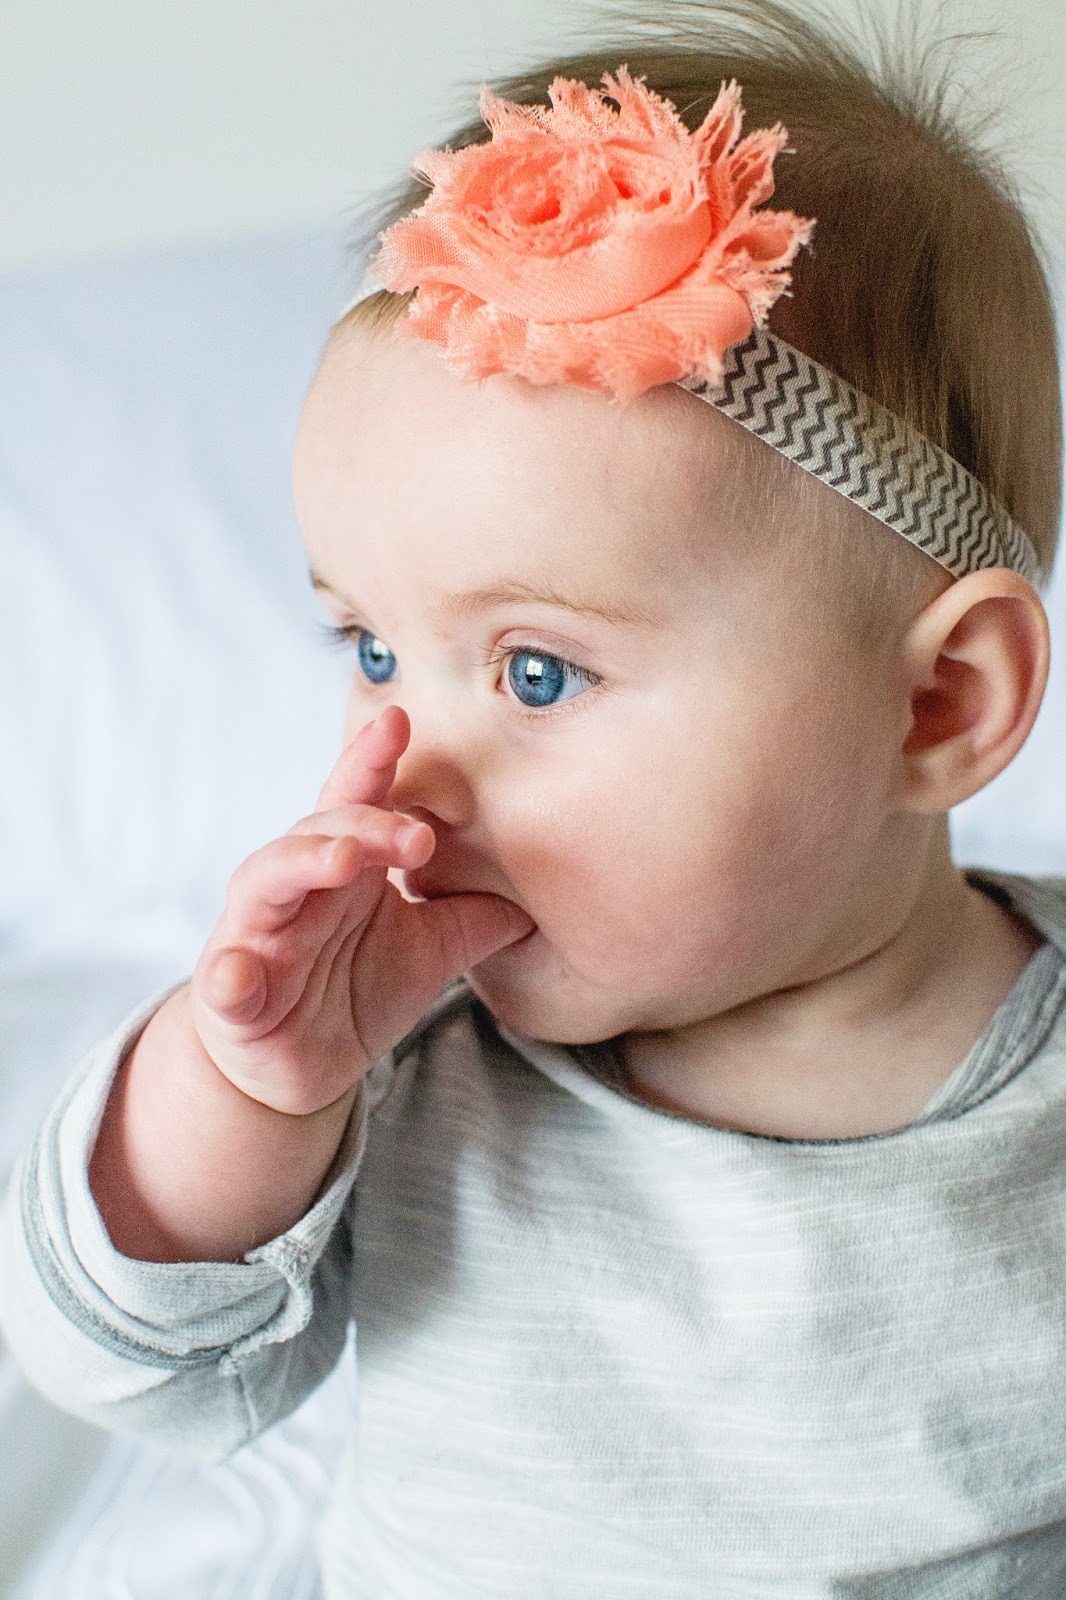
4. Think of shots that will showcase your child’s personality and the current milestones they are experiencing.
For babies, this means showcasing new skills like rolling over or sitting up or even just them blowing bubbles. For older kids, it might mean showing off their braces or having them show off a new dance move or sports technique they learned. Generally, the less “posed” you make them be, the better the shot.
Bonus Tip: When I’m shooting portraits of older subjects, I’ll actually have the person talk to me while I’m taking pictures. Not only does it relax them and make them focus less on the awkwardness of posing, but you can actually get some really amazing true-to-nature shots of people because they’ll naturally be making the same faces and gestures that they normally would, which are the best kinds of things to capture.

5. Don’t be afraid to get close!
Often, the only difference between a good shot and a great shot is your proximity to the subject. Often, getting closer to your subject (or “filling the frame,” as it’s referred to in photography) is a more surefire way of getting a shot you love.

6. Think outside the box with your angles.
Often, because we’re so used to doing it, we ask someone to stand (or sit) straight-on to the camera, smile, and we take the picture. While you might get a couple decent shots by doing this, they will be far from exciting (or even very flattering). Try having an older subject move their nose to one side or the other so it’s not directly full-on to the camera, and experiment with the body positioning so it’s not full-on facing front either. And definitely don’t trap yourself into thinking that your shots need to even be “posed” at all! Usually, it’s much more effective if you simply move around a subject (capturing various angles) while he/she is engaged in an activity of some kind, such as twirling, rolling over, playing with a toy, etc.
Going along with this, make sure you try shots of your subject standing (if he/she is able), sitting, and even lying down. Also, when a subject is standing, give them something to do. Since a standing pose is usually the most awkward for the subject, have them do something like lean against a wall, put their hands on their hips or in their pockets, run their hands through their hair, or do more unconventional things like do a few dance moves, tell you a funny story, or jump in the air. I’ve had subjects do all these things in shoots, and it never ceases to surprise me how much better the shot is when I tell the subject to do something kind of silly and allow them to loosen up a bit.

7. Choose natural lighting if at all possible.
If you’re doing your shoot indoors, try to shoot during the day, and turn off all overhead lights and open up all windows (and doors, if they aren’t going to be directly in the shot) in order to let in as much natural light as possible. Natural light is SO much more flattering, and it gives a much nicer overall “tone” to your picture.
Here’s a shot with indoor lighting turned on (note the yellowish tint to the skin and slightly odd shadows on the face:

Here’s a shot with indoor lights turned off and windows open:

8. If you have a DSLR camera that shows you where the camera’s focus is, make sure the focus is always on one of your subject’s eyes (usually the one closest to you is best).
This is one of the most useful things pointed out to me by one of my photography instructors, and it’s made a world of difference in my shots. It might take a little more maneuvering and planning, but the end result will always turn out better. (I can’t tell you how many shots I’ve done that were thisclose to being amazing but that I didn’t like as much because the focus was just slightly off of the eyes).
Shot without the focus on the eyes:

Shot with the focus on the eyes:

Quick note while I’m on the subject of cameras (since readers have asked for recommendations in multiple posts)—
If you are willing to spend some time figuring it out and want to be able to get high quality pictures of your family, I personally think it’s worth it to invest in a DSLR camera. Now, that’s not to say that you need to go for professional-grade full-frame DSLR camera–in fact, I used Nikon’s entry-level DSLR for years (even when I started to get paid for my work) before I upgraded to a more expensive model.
Since I only shoot with Nikon, I don’t really know much about other brands and models, so I’ll just include my recommendations for Nikon here. (Note: there are affiliate links below, which means that I get a small commission for each sale at no extra cost to you.)
I shot with the Nikon D3100 for years (as I mentioned above), but it has since been discontinued and replaced with the D3300. You can still find the D3100 sometimes (like here), and it usually runs fairly cheap (around $200-300 for the body alone). However, the D3300 comes with some notable upgrades and if you get it refurbished and without the attached kit lens, you can actually get the body for almost as cheap as the D3100 – around $300. If you look at local classified ads, you can find these entry-level models for even cheaper.
Of course, as with any DSLR camera, you must have a lens before you can take any kind of picture. If you ask my opinion, the kit lens that comes with the camera is terrible, so it’s often not even worth paying the extra cost to get the camera with that kit lens—better to just get a camera body by itself and purchase a good prime lens that will let you get great shots both indoors and outdoors. (A prime lens is just a lens that doesn’t zoom but that gets better pictures indoors because it can let in more light.) My first lens purchase was a Nikkor 35mm f/1.8g lens, which is a well priced lens (at under $200) that gets you GREAT results. Like I said, it doesn’t zoom, but it does give you great-quality indoor pictures (as well as outdoor), and if you know how to shoot in manual mode, it’s a really nice lens to get that blurred-out background look (called bokeh).
My second lens purchase (because I DID want a zoom option) was a Nikkor 18-140mm f3.5-5.6, which is quite a bit more expensive than the first lens, though it’s one I still use in photo shoots. If you’re willing to go for a refurbished model, you can knock about $200 off the price.
9. Take the time to edit your favorite photos.
If you’re willing to spend a little money, Lightroom and Photoshop Elements are relatively affordable options that will give you a huge bang for your buck. If you’re a student or teacher, you can get Lightroom from Amazon for only about $70 (it’s around $150 otherwise). And Photoshop Elements is even cheaper–about $60 on Amazon. (In case you’re unfamiliar with Photoshop Elements, it’s basically a much simpler, more user-friendly version of Photoshop that includes many of the main elements of full Photoshop but at a fraction of the price. If you’re not looking to go pro anytime soon, Elements is a fabulous photo-editing tool that has both beginner (guided) and advanced options for editing your photos.
If you’re looking to go free all the way, there are tons of free photo editing apps and sites to check out. My favorite free website is Fotor, which allows you to easily manipulate things like brightness and contrast, change the coloring, make a photo black and white, etc.
Also, a fantastic resource for beginner editors who don’t know the ins and outs of an editing program like Lightroom or Photoshop is what’s known as “actions” in the photo editing world. Basically what you do is you download an “action” for Lightroom or Elements that you like, and you apply it to the photo. The “action” is a series of saved presets, so it does all the editing and touching up of a photo for you, with minimal or no input needed on your part. A great blog that has a ton of free actions is The Coffeeshop Blog. You can also purchase actions through various photography companies or blogs for a small(ish) fee (usually from about $25-50 for a package).
On the left is the straight out-of-camera shot, on the right is with the action “Peachy Matte” applied (from the Coffeeshop Blog), which doesn’t require any Photoshop Elements knowledge.


The straight out of the camera shot:

With the “Enduring Love” preset from the Coffeeshop blog (with just pushing “ok” on the first feature that pops up):

If you found this useful, please share!